While SQLite databases work very nicely on mobile devices, there is no easy way to get them there. You can’t just add the name of your database to the manifest and be able to use it when your app is deployed.
Until App Studio 2.5, that is. When you add the name of an SQlite database to the manifest field in Project Properties, App Studio will automatically convert the database to a format which can be transferred, then convert it back into a database on the device.
Let’s see how this is done. We’ll use the famous Northwind database which comes with many Microsoft products. I went online and found it in SQLite format.
First, I needed to clean up the database a bit. Some of the fields won’t work on mobile devices. I like to use a utility called SQLiteExpert to look at the database and make changes to it. In this case, I needed to clear out the images (they are not in Base64 format) and get rid of the indexes, which are not supported on mobile devices.
I then added Northwind.db into the manifest. (Load the Northwind sample to see this.) Adding a database to the manifest can be as simple as just adding the name of the file. In this case, we’re going to use a couple of extra features:
dbName, ID, callBackFunction
dbName is the name of the database file in your project folder. ID is the variable to use to reference the database in your app. callBackFunction is the name of the function to be called once the load of the database is completed. ID and callBackFunction are optional.
Northwind.db,DB,loadGrid
When we choose Deploy from the Run menu, Northwind.db will be encoded and included with the deploy. When the app is started on the device, it will create Northwind.db if it does not exist. Once complete, the function loadGrid() will be called in the app. Here’s how loadGrid looks:
Sub loadGrid
  NSB.ShowProgress("Loading grid with customers...")
  DB=SqlOpenDatabase("Northwind.db")
  s=Array(["Select * from Customers ORDER BY CustomerID;", dataHandler])
  Sql(DB,s)
End Sub
To complete our example, we need a dataHandler function, which is called when the SELECT is completed. It takes the returned data and displays it in a Grid:
Sub dataHandler(transaction, result)
  DBrecords=result
  For i=0 To DBrecords.rows.length-1
    record=DBrecords.rows.item(i)
    Grid1.setValue(i,0,record["CustomerID"])
    Grid1.setValue(i,1,record["CompanyName"])
    Grid1.setValue(i,2,record["City"])
    Grid1.setValue(i,3,record["Country"])
  Next
  Grid1.refresh()
  NSB.ShowProgress(False)
End Sub
Here’s what the result looks like:
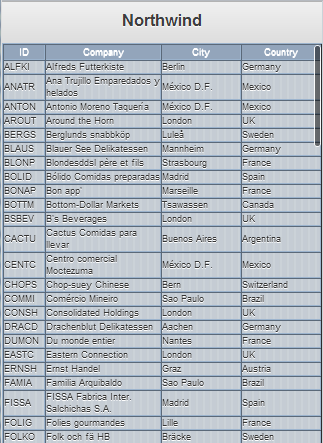
That’s all there is to it. Now it is easy to include databases with your app!
Notes
- SQLiteExpert’s Professional version has the option to import data from ADO data sources. You could use this to import an Access database, save it as SQLite and use it in App Studio.
- On the device, or when running locally in the browser, the database is created in the browser’s local storage area. It will not be available to other apps, unless they are started from the same server as your app. This keeps the databases secure.
- You can look at the stored database using the Chrome Debugger when running in the local browser.
- To export a database, using SQLExport().
- The filename of the database you put into the manifest needs to end in .db or .sqlite.