The new name of the manifest file

When you deploy your project, App Studio sends an extra file to the server called the manifest. It contains a list of files which are part of your project and should be downloaded to the device, so it can run offline.

When we released App Studio in 2010, the ending for this file was .manifest. Someone noticed that Microsoft was already using .manifest for another purpose. A few months ago, the standard was changed to .appcache (though .manifest is also fine.)

In App Studio 2.5, the default for new projects is .appcache. Existing projects will continue to use .manifest and work fine. You can control the ending of the manifest file in the new ‘manifestfile’ Project Property.

If you want to use .appcache in your project, you will need to a few things:

  1. Change manifestfile in Project Properties
  2. Delete your project completely from your server and do a full deploy.
  3. Make sure your server gives a MIME type of text/cache-manifest for .appcache files. More info is here.

One of the benefits of using .appcache is that some servers are already configured with the right MIME type. An interesting one is DropBox: if you deploy your project to the Public folder of your DropBox, people can run it from there.

Including Databases with your App

While SQLite databases work very nicely on mobile devices, there is no easy way to get them there. You can’t just add the name of your database to the manifest and be able to use it when your app is deployed.

Until App Studio 2.5, that is. When you add the name of an SQlite database to the manifest field in Project Properties, App Studio will automatically convert the database to a format which can be transferred, then convert it back into a database on the device.

Let’s see how this is done. We’ll use the famous Northwind database which comes with many Microsoft products. I went online and found it in SQLite format.
Continue reading “Including Databases with your App”

Deploying your app via DropBox

Note: The problems that DropBox had which affected this method were fixed on Jan 28, 2013. Everything is working again!

Looking for a way to make your apps available to the world without getting your own website? DropBox could be the answer: best of all, it doesn’t cost anything.

DropBox, if you haven’t used it, lets you put a directory of files from your system in the cloud. To you, it just looks like another directory on your PC or Mac. Behind the scenes, the content of the directory is mirrored on DropBox’s servers. Where it gets really cool is that you can have that same directory on other computers – yours or your friends. Sign up is free, and you’ll get a couple of gigs of storage.
Continue reading “Deploying your app via DropBox”

Use Dropbox to quickly install .apk files

Want a quick way to get an App Studio app compiled with PhoneGap onto your Android device? Use Dropbox!

  1. Build your app using PhoneGap as always.
  2. Put the resulting .apk file into your DropBox. (Get an account if you don’t already have one – it’s free!)
  3. Install the Dropbox app on your Android device if you have not done so already.
  4. Open Dropbox on the device and click on your .apk file. It will install!

(If you have not used Dropbox yet, it’s a great tool. It puts what looks like an ordinary folder on your PC or Mac desktop. You can share it with other users and computers: add a file to your Dropbox and your other computers can use it right away. There’s lots more, but this already is the simplest network share you have ever experienced. Installation is also very simple.)

Ajax Made Simple Part 6: Where to put your PHP file

For development, put the PHP files for your project right in your project folder. You can then use any text editor that you have installed on your system to edit them.

Next, add the file names to the manifest in Project Properties. When you do a Full Deploy, they will be copied to the server with the rest of your project.

The result is that your PHP files will be placed on the server, in the same folder as your app. Your app can call a PHP script by just giving the file name – no path name will be needed.

Ajax made Simple Part 2: POST.

You may have read the recent blog entry called Ajax made Simple. Today we’re going to extend that a bit and talk about using the POST method.

The last blog post discussed the simplest Ajax call, which sends data to the server by adding it to the end of the URL, a method called, rather misleadingly, GET. But what if we want to send more data? GET has a limit, some say, of around 2000 characters. For more than that, we’ll use the also badly named POST method. POST has an upload limit on most servers of 8 megabytes. If you need more, server settings can be adjusted.

Let’s look at some code. You’ll see it looks very much like our last post:

Function btnAjax_onclick()
  req=Ajax("ajaxPost.php","POST",txtSend.value)
  If req.status=200 Then 'success
    htmResponse.innerHTML=req.responseText
  Else 'failure
    htmResponse.innerHTML="Error: " & req.err
  End If
End Function

The difference is a couple of extra parameters. We add “POST” and the data we want to send as a separate parameter. Before we talk about what is going to happen at the server end, let’s see what the app looks like:
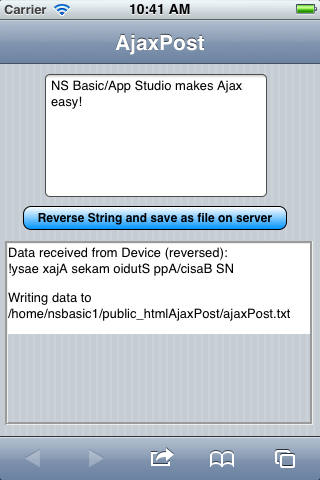
OK, here is the PHP code on the server which we are calling:

<?php
 // uncomment the next line to see runtime error messages from this script
 // ini_set('display_errors','1');
 
 // Get the data from the client.
 $myText = file_get_contents('php://input');
 // Send back the text, reversed
 echo "Data received from Device (reversed):<br>" . strrev($myText); 
 
 //write the data out to a file on the server
 //make sure permissions are all OK!
 $myFile = "AjaxPost/ajaxPost.txt";
 echo "<p>Writing data to " . getcwd() . $myFile;
 $f = fopen($myFile'w'or die("can't open file");
 fwrite($f$myText);
 fclose($f);

?>

The file_get_contents(‘php://input’) call gets the data, exactly as it was sent. We’ll do two things with it: echo it back reversed and we will write it to a file on the server. The first part is easy: anything in an echo statement is sent back to our app:

echo "Data received from Device (reversed):
" . strrev($myText);

The second part involves a bit more PHP, but is straightforward. It writes the data was received to a file.

 $myFile = "AjaxPost/ajaxPost.txt";
 echo "<p>Writing data to " . getcwd() . $myFile;
 $f = fopen($myFile, 'w') or die("can't open file");
 fwrite($f, $myText);
 fclose($f);

What would you use this feature for?

  • Upload a JSON copy of your database.
  • Upload some pictures in Base64 format.
  • Create a .htm file which can be accessed as a web page.
  • Lots more ideas!

A tip on debugging PHP scripts
Since PHP scripts run on the server and not on your screen, you don’t get to see the error messages. This can make debugging difficult. If you put this statement at the top of your PHP script, the error messages will be echoed to your app:

ini_set('display_errors','1');

The error messages come back as HTML formatted text. The best way to look at them is to assign them to the innerText property of an HTMLview control.

Building Native Apps

The enhancements in NS Basic/App Studio 1.3.1 make building native apps much easier. First, a bit of background: NS Basic/App Studio is designed to make Web Apps. These apps take advantage of the power of current browsers and HTML5 to make native appearing apps. With the speed improvements of JavaScript in recent years, they have excellent performance. Web Apps can also be compiled into Native Apps, which have their own advantages and disadvantages.

Under the Run menu, there is an option called “Build Native App”. Once you have tested your project, use this option to submit your app to the PhoneGap Build server. The compilers and SDKs to build native apps are large and complex: using a server to perform these operations saves you a lot of grief installing and maintaing them.

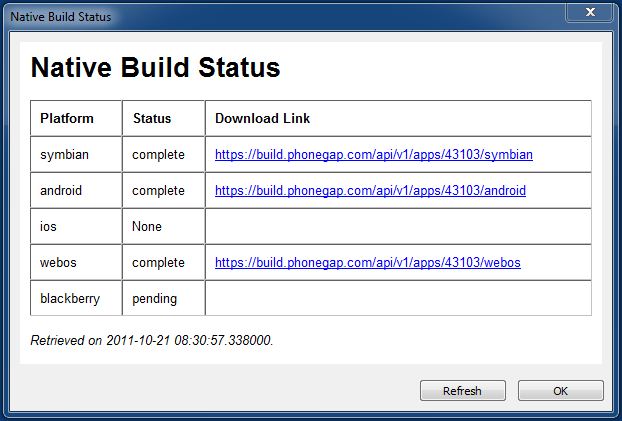
Once submitted, you can check the status of the build using “Get Native Build Status” under the Run menu.

Completed builds have their download links listed.

Some useful notes:

  • Each user of PhoneGap Build should have their own account. For demo purposes, NS Basic has a default account, but your files will not be secure there. It’s easy to sign up for your own. Once you have it, enter the information into “Deploy Options” under the Tools menu.
  • The program name and your icon will be taken from your project properties. Other PhoneGap options are set up in the configxml property in your project’s properties. Read more about using config.xml here.
  • iOS will not build until Apple’s signing information has been entered.
  • PhoneGap Build is in beta right now. PhoneGap may start charging for this service at a some point.

PhoneGap 1.0 released!

PhoneGap has announced that Version 1.0 is now available. The release puts the focus on accessing native device APIs, which is new ground for the web. Other improvements include:
* Overall API stability and “pluggable” architecture
* W3C DAP API compatibility
* Contacts API
* Remote debugging tools
Today’s release also includes a new unifying bridge interface that makes adding platforms and platform extensions easy. Plus, developers will be pleased to see that the plugin development process has been simplified.

PhoneGap lets NS Basic/App Studio users package their apps for iOS, Android and other app stores. It also gives them additional API functions.

The easiest way to make use of PhoneGap is with PhoneGap Build. There is also a tutorial on using PhoneGap Build.

Here are some other NS Basic + PhoneGap resources: