Getting money from your customer: PayPal

It’s easy to use PayPal with NS Basic/App Studio. You can collect the money as payments or a donations. PayPal is available in many countries. It’s much easier to set up and use than a credit card.

First, set yourself up as a PayPal Merchant. Assuming you already have a PayPal account, go to the Merchant Services tab on the main screen. On the left, you will see a tab called “Website Payments Standard”. Click on that and follow the instructions.

Once you are set up as a merchant, you will need to set up your product. The easiest way to do that is on the Merchant Services page: Choose the “Buy Now button” option. Enter a number of fields, including item name, item ID (a reference number for your own use), price, currency (21 choices!), shipping and tax info. Once complete, click on ‘Create Button’.

It will go to a new page, showing the code for the button. You’re interested in the string just after “value=”. In this case, it is “UEQCPME2W9Q8W”. Copy this number down – you will need to enter it in the IDE:

In your project, add the PayPal button like any other and position on your form. It will have the following properties:

Put the value from the PayPal screen into ‘hostedButtonID’. For TransactionType, select ‘Buy’ or “Donate’. One of the following will appear on your form:

That’s all you have to do. When your app is running, if the user clicks on the PayPal button, a new browser window will open to the PayPal page, with your product showing. All they have to do is authorize the transaction and the money will show up in your PayPal account.

If you’re running as a web app, you do not have to pay 30% to Apple. Please be careful of local tax laws and restrictions.

How to do Encryption

Encryption is easy to do in NS Basic/App Studio using an encryption library. For the purposes of this post, we’ll use the Stanford JavaScript Crypto Library. It uses the industry-standard AES algorithm at 128, 192 or 256 bits; the SHA256 hash function; the HMAC authentication code; the PBKDF2 password strengthener; and the CCM and OCB authenticated-encryption modes. Just as importantly, the default parameters are sensible: SJCL strengthens your passwords by a factor of 1000 and salts them to protect against rainbow tables, and it authenticates every message it sends to prevent it from being modified.

First step is to add the library to your project. You can follow the steps here, or simply export and import the library from the Encrypt sample.

Encryption works by supplying a password which is used to scramble the text in such a way that it is virtually impossible to unscramble without that password.

There are two important functions: encrypt(password, text) and decrypt(password, text).

Here is how you would use them in a program:

Function btnEncrypt_onclick()
  txtEncrypted.value=sjcl.encrypt(txtPassword.value, txtPlain.value)
End Function

Function btnDecrypt_onclick()
  txtPlain.value=sjcl.decrypt(txtPassword.value, txtEncrypted.value)
End Function

sjcl is the reference to the encryption library. It is created as a result of the inclusion of the library in the project. Once your data is encrypted, you can save it to a database or send it to another computer.

Including JavaScript libraries in your project

There’s a huge amount of JavaScript code available on the net. If you need a special function that isn’t already in NS Basic/App Studio, chances are that someone has written it in JavaScript and made it available for download. It’s easy to add this code to your project.

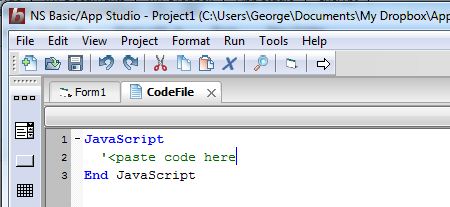
First, from the Project Menu, choose Add New Code File and enter in JavaScript…End JavaScript:

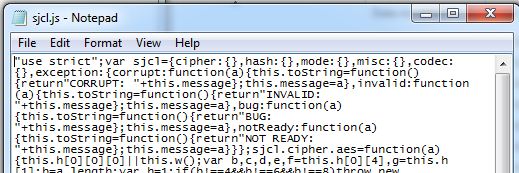
Next, let’s get the JavaScript code and open it in NotePad. For this post, we’re going to use the Stanford JavaScript Crypto Library. Here’s what it looks like in NotePad:

Not very readable: it has been minimized. No matter for us – we don’t have to read it to use it. Copy the complete text and paste it in between our lines of code. Delete the “use strict”; at the start of the line.

Finally, let’s name our new code file something useful:

The library is now part of your project. We will cover actually calling it in the next blog post (it’s easy!), but to finish this one off, let’s discuss how to reuse this code file in another project.

Under the File Menu, choose Export Current Form/Code… This will save the code file as a separate .cod file.

To load a .cod file into your project, choose Add Existing Code File… from the Project menu:

The code module will be added to your project. .COD files are a handy way to share code. If you have a good one, feel free to save it to the Files section of the web board.

Note: Be respectful of any license restrictions on the code snippits you use. Sometimes it’s as simple as including the author’s name in a comment. Sometimes you’re not allowed to use the code in an app you sell. It’s wise to follow the author’s request.

NS Basic/App Studio 1.2.5 Released!

NS Basic/App Studio 1.2.5 is ready to download. You can download it from the same URL as before. We will also be sending an email with the address to registered users.

There are a few nice new features:
– New samples for TextToSpeech, Encryption and Sencha Touch.
– New ButtonBar and PayPal controls
– Deployment improved
– Lots of fixes and usability improvements

1.2.5

  1. Samples: TextToSpeech sample added.
  2. Samples: New Encrypt sample added.
  3. Controls: new PayPal button control to “Buy Now” or “Donate”.
  4. Controls: new ButtonBar control.
  5. Design Screen: Right click to add control.
  6. Samples: new SenchaKitchenSink (work in progress)
  7. Code Window: improve syntax error checking for HTML blocks.
  8. Code Window: Fix line continuation problem with syntax checking.
  9. Code Window: Fix problem with block comment selection.
  10. Code Window: Fixed generated event functions in JavaScript mode.
  11. Controls: Grid has new refresh() function.
  12. Controls: iMenu.addItem now adds images properly. (Thanks, Brian Leach!)
  13. Controls: Audio and Video no longer have extra / in tag.
  14. Deploy: Improvements for IIS servers.
  15. Deploy: Improvements to server folder creation.
  16. Deploy: Streamline some HTML in the header.
  17. Deploy: Manifest file now called index.manifest for PhoneGap.
  18. Docs: Handbook and Language Reference updated.
  19. Language: GetRef() function added. See Language Reference.
  20. Samples: fixes to Base64Image, Signature, SqlSample1
  21. Samples: Reorganized folder.
  22. Sencha: Added Overlay() function. See SenchaKitchenSink sample
  23. Translater: Functions with “_” in their name fixed.
  24. Translator: x = {b: {d: a, e: a}, c: a} fixed.
  25. Translator: If a.b=true then… no longer changes value of a.b.
  26. Translator: If If a then MsgBox “b” fixed.


Documentation Changes for Version 1.2.5

  1. New PayPal control: This provides an easy way to collect a payment or a donation from a user. Tapping on it will bring up the PayPay Payments screen with the user and amount filled in – all they have to do is approve the transation. To use it, you need to have a PayPal Merchant Account (easy to set up), and use Merchant Services to create a button. Use the ID number it gives you in the properties of the button, and specify whether this is a Donation or Purchase. This feature will be handy for those selling commercial or donationware apps.

  2. New ButtonBar control: This control lets you arrange two or three buttons, either as a titlebar or lower down on the form. This are usually used for apps with multiple forms to switch between. Each form will have a buttonbar control on it, with a different button highlighted.

  3. Text to Speech: A new sample has been added showing how to get the device to speak a text string. To do this, you will need to sign up with iSpeech. The first 1000 words are free.

  4. Sencha Touch is an additional library of controls and functions. The best way to experience it is to run the new KitchenSink sample in the Sencha folder. It has some beautiful effects (more coming), but since it is fairly large, it can slow down app deployment and loading.

  5. Grid.refresh(): This new function should be called whenever the size of a grid changes, or when a scrolling grid is opened on a new form. It replaces the SetTimeout(grid_ref.refresh(),100) that used to be needed. Check the GridWithScrolling sample to see how it is used.

  6. Design Screen: When you right click on the Design Screen, there is an option to “Add Component”. This brings up a list of all the controls: you can pick which one you want to add to the form. This is especially useful for people whose screen is too small to display the complete ToolBar. You can even turn the Toolbar off under the View menu if you are no longer using it.

PhoneGap 1.0 released!

PhoneGap has announced that Version 1.0 is now available. The release puts the focus on accessing native device APIs, which is new ground for the web. Other improvements include:
* Overall API stability and “pluggable” architecture
* W3C DAP API compatibility
* Contacts API
* Remote debugging tools
Today’s release also includes a new unifying bridge interface that makes adding platforms and platform extensions easy. Plus, developers will be pleased to see that the plugin development process has been simplified.

PhoneGap lets NS Basic/App Studio users package their apps for iOS, Android and other app stores. It also gives them additional API functions.

The easiest way to make use of PhoneGap is with PhoneGap Build. There is also a tutorial on using PhoneGap Build.

Here are some other NS Basic + PhoneGap resources:

JSON – A cool way to transfer data!

One of the enhancements in NS Basic/App Studio 1.2.4 was the addition of JSON support. If you want the full details on what JSON is, read about it on Wikipedia. For our purposes, it is a fast way to wrap up a bunch of data up so it can be transmitted or received.

Using JSON, you can take a data structure or a complete SQLite database and turn it into a string which you can send to another system using HTTP POST or WebSockets. You can also receive a string the same way, which you can then turn into active data in your program or save to SQLite. You can also use JSON to encode a database which can then be installed with your app. Your app can read it in and construct the database.

It’s fast. We did a benchmark where we created an SQLite database with 20,000 customer address records. Exporting that database to JSON on an iPhone 4 took just over 1.1 seconds. Importing 1,000 records to a new database took 2.2 seconds. Tests on an Android Nexus S were also fast: import in .851 seconds and export of 20,000 records in 3.8 seconds. It’s quite practical to use on large files.

Here is how to export an SQLite database using JSON:

Function JSONExport()
  Dim i
  recs=DBRecords.rows.length
  Dim data(recs)
  For i=0 To recs-1
    data[i]=DBRecords.rows.item(i)
  Next
  JSONExport=JSON.stringify(data)
End Function

What this code does is to copy the database into an array, with one element for each row of the database. The JSON.stringify() function converts it all to a JSON string.

Here is some code which imports an SQLite database:

Function JSONImport()
  Dim data, sqlList, q
  file=ReadFile("customers.json")
  data=JSON.parse(file.responseText)
  DB = SqlOpenDatabase("customers.db","1.0","My Customer Database")
  q=Chr(34)
  If DB<>0 Then
    sqlList=[]
    sqlList[0]=["DROP TABLE customerData;",,skipError]
    sqlList[1]=["CREATE TABLE IF NOT EXISTS " & "customerData('name', 'address1', 'address2', 'age', 'sales', PRIMARY KEY('name') );"]
    
    For i = 0 To UBound(data)-1
      Name    = q & data[i].name & q
      Address1= q & data[i].address1 & q
      Address2= q & data[i].address2 & q
      Age     = data[i].age
      Sales   = data[i].sales
      s = Join([Name, Address1, Address2, Age, Sales],",")
      sqlList[i+2]="INSERT INTO customerData (name, address1, address2, age, sales) VALUES ( " & s & ");"
    Next
 
    sqlList[i+2]=["SELECT * from customerData ORDER BY name;", dataHandler]	  
    Sql(DB, sqlList)
  End If  
End Function

The ReadFile in the third line is interesting. “customers.json” is a file that is included in the project’s manifest and deployed with the project. ReadFile() reads the entire file in.

The fourth statement does all the work. It takes the data that was read in and turns it into an array, with one element per row. From there, it is straightforward to process it and add the records into the SQLite database.

You can try this sample out: it is called SqlSample1, and it is installed with NS Basic/App Studio starting with 1.2.4.

If you are curious about the format of the JSON file, here’s a sample:

[{"name":"Customer0","address1":"0 Winding River Lane","address2":"Anytown USA 100000","age":32,"sales":56025},{"name":"Customer1","address1":"1 Winding River Lane","address2":"Anytown USA 100001","age":75,"sales":86082},{"name":"Customer10","address1":"10 Winding River Lane","address2":"Anytown USA 1000010","age":23,"sales":52976},{"name":"Customer100","address1":"100 Winding River Lane","address2":"Anytown USA 10000100","age":87,"sales":26473},{"name":"Customer101","address1":"101 Winding River Lane","address2":"Anytown USA 10000101","age":10,"sales":45455},
...

The data is represented as an array, with one element for each row of the array. Each element is made up of a list of fieldnames in quotes and values. String values are in quotes; number values not.

NS Basic/App Studio 1.2.4 Released!

NS Basic/App Studio 1.2.4 is ready to download. You can download it from the same URL as before. We will also be sending an email with the address to registered users.

There are a few nice new features:
– Lots of right click features in the Design Screen
– JSON support for data interchange
– Faster deploying
– Lots of fixes and usability improvements

1.2.4

  1. JSON support added. See docs below.
  2. Design Screen: Right click on a control brings up lots of options.
  3. Properties Window: Now remembers folder settings on restart.
  4. Controls: Button is now square with rounded corners. See docs below.
  5. Deploy: Faster, since only files actually used are deployed.
  6. Code Window: Sleep 5000 no longer hangs IDE for 5 seconds.
  7. Code Window: Problem with indenting fixed.
  8. Code Window: Resume is no longer highlight.
  9. Controls: HTMLview now scrolls properly.
  10. Deploy: 550 error on some servers fixed.
  11. Deploy: If serial number is removed, deploy still works.
  12. Demo Screen: PayPal button added.
  13. Design Screen: Fix problem with pasting multiple copies of a control.
  14. Design Screen: Right click on a control brings up options.
  15. Docs: Handbook and Language Reference updated.
  16. IDE: Improved demo screen.
  17. IDE: Deploy password now encrypted.
  18. Language: DIM array can now have any number of dimensions. (Thanks to Thomas Gruber!)
  19. Language: New functions – JSON.stringify(), JSON.parse().
  20. Language: New statement: Sleep
  21. Runtime: Added BlackBerry to supported device browsers.
  22. Samples: SQLSample1 now uses JSON to output SQLite database.
  23. Samples: MiniDataServer is an alternative to WebSockets. (Thanks to Robert Borsuk!)
  24. Samples: New GoogleReverseGeocoding sample.
  25. Samples: ReadFile uses updated HTMLview.
  26. Translator: ‘f = FactCalc()’ was not always translating properly.
  27. Translator: ‘Function test(p) one’ no longer hangs IDE.
  28. Translator: Dim(10,10,10) was not creating all elements.
  29. Translator: Typename(“12345a”) returned Integer, not string.
  30. Translator: Dim(a.b) is now allowed.


Documentation Changes for Version 1.2.4

  1. Make sure you do a full deploy the first time you run the new version.

  2. JSON is now supported. JSON is a standardized way of converting objects to strings so they can easily be saved or transmitted to other systems. For example, you could convert an SQLite database to JSON, then transfer it to a server using WebSockets or HTTP POST. The server would then unpack it and process it.

  3. Buttons now look more like standard iOS buttons. The edges are now straight: just the corners are rounded. Any new buttons you create will have the new look: to upgrade old buttons to the new look, enter nsbbutton into the class property of the button in the IDE. To keep the old appearance, leave the class property blank. Be sure to do a full deploy to see this change.

NS Basic/App Studio 1.2.3 released!

NS Basic/App Studio 1.2.3 is ready to download. You can download it from the same URL as before. We will also be sending an email with the address to registered users.

There are a few nice new features:
– New List controls
– jQuery sample
– Scrolling enabled for more controls
– Lots of fixes and usability improvements

1.2.3

  1. Controls: New MenuNumberTitleDescArrow (see docs below)
  2. Controls: New MenuNumberTitleTime (see docs below)
  3. Controls: New MenuTextBlock (see docs below)
  4. Samples: New jQuery sample.
  5. Samples: New BarCode reading sample.
  6. Code Window: Shortcuts: Ctrl F for Find, Ctrl G for Find Next.
  7. Code Window: Multi line statements are syntax checked correctly.
  8. Controls: Grid scrolling improved.
  9. Controls: MultiInput and Menu now support scrolling.
  10. Docs: Handbook and Language Reference updated.
  11. Deploy: Extra MKD operations removed: deploy speed improved.
  12. Deploy: Improvements to error messages.
  13. Language: New bitwise functions: ANDb, ORb, XORb, NOTb. See Language Reference.
  14. Project Explorer: right click to move and delete controls.
  15. Project Explorer: Problem with deleting all forms fixed.
  16. Properties Window: Return no longer needed to save changed value.
  17. Runtime: “UpdateReady” cache message now reads “Update Complete – Restarting”
  18. Runtime: Global code is executed before first form shows.
  19. Runtime: iScroll.js updated to 4.1.2
  20. Runtime: Removed some unneeded image files.
  21. Samples: Communicating: Add Skype calling as an option, refresh screen.
  22. Samples: New BarCode reading sample.
  23. Samples: New GridWithScrolling sample.
  24. Samples: New MenuNumberTitleDescArrow, MenuNumberTitleTime, MenuTextBlock samples.
  25. Toolbox: Controls are now in alphabetic order
  26. Translator: Replace(s,”)”,””) fixed.
  27. Translator: a=Log(1) fixed.
  28. Translator: a=5.1 mod 3.1 fixed.
  29. Translator: a=[{b:1}] fixed.
  30. Translator: t[1,(1) Mod 2] fixed.


Documentation Changes for Version 1.2.3

  1. MenuNumberTitleDescArrow: This new control shows a number (or word), title, optional description and an arrow. See Language Reference for more details.

  2. MenuNumberTitleTime: This new control shows a number (or word), title and optional time. See Language Reference for more details.

  3. MenuTextBlock: This new control shows blocks of text and an arrow. Useful as a preview of text. See Language Reference for more details.

Using Facebook with NS Basic/App Studio

It’s easy to get Facebook information into your NS Basic/App Studio program. Facebook has an API that is easy to access. Send a message to it, and it will return the information you requested.

Here’s how to request information on Mark Zuckerberg:

$.getJSON("https://graph.facebook.com/MarkZuckerberg", "callback=?", gotJSON)

A bit of explanation is in order.
The $.getJSON() function is in an external library named JQuery. JQuery is a very popular library for JavaScript developers. Fortunately, it can be called from NS Basic/App Studio quite easily. Simply put the following into your project’s “extraheaders” property:

<script type="text/javascript" src="https://ajax.googleapis.com/ajax/libs/jquery/1.6.0/jquery.min.js">
</script>

(You could also download the file jquery.min.js into your project’s directory and add it to your manifest.)

The getJSON call has 3 parameters: the URL to get information from, any parameters to send to the URL, and the return function. In this case, we want to get information about Mark Zuckerberg.

When it comes back, we want the function gotJSON to be called on our program. This is an asynchronous operation: your program can continue to run while we wait for graph.facebook.com to reply. When it does, our function is called.

Here is what gotJSON looks like:

Function gotJSON(data)
  If data["error"] Then
    txtData.value = data.error.message
  Else
    txtData.value = ""
    For Each index, item in data
      txtData.value = txtData.value & index & ": " & item & vbCRLF
    Next
  End If
End Function

The data is returned as a JSON object, which ) is a lightweight text-based open standard designed for human-readable data interchange. What’s left to do is to display the object. Taking advantage of For Each’s ability to iterate both the names and the values of each member of the object, we output one line for each member. Here is the output:
facebook

For more information on the Facebook API, see http://developers.facebook.com/docs/reference/api/.