Using a local copy of jqWidgets

If you use any of the jqWidgets samples, you’ll notice the files for jqWidgets get loaded directly from jqwidgets.com. This makes sure that our samples are always using the latest versions of the files, and means we don’t have to include the entire jqWidgets library in the AppStudio distribution.

However, in the apps you create, it may be more convenient or efficient to have the files on your own system and served from your own server.

Furthermore, if you’re planning to compile your app using PhoneGap, you’ll need to have the files saved locally so they can be included in the app.

In AppStudio 5.0.10, we made this easier to do. Here’s how:
Continue reading “Using a local copy of jqWidgets”

Make your own Windows apps!

AppStudio 5 lets you create native Windows apps from your projects. It’s dead simple: Choose ‘Make Windows Executable (exe)’ from the Run menu, and your Project.exe file is ready a few seconds later.

Now you can distribute your apps to Windows users easily. All your project files are included, and it’s simple for your users to install.
Continue reading “Make your own Windows apps!”

Container, Part 2: Putting controls inside

In our last blog post, we looked at how the new AppStudio 5 Container control could be used to create your own controls. Today, we discuss how the Container can be used to group controls.

There are a few reason to do this:

  • Controls in a Container can be moved around by moving just the Container
  • Controls can be logically combined in groups.
  • Controls can be visually linked by drawing a border around them.
  • Controls can be grouped together for Responsive Design purposes.

Let’s see how this is done:
Continue reading “Container, Part 2: Putting controls inside”

Container, Part 1: Make your own control

One of the new controls in AppStudio 5 is the Container. It has a couple of uses: you can create your own controls with it, or you can use it as a container for other controls. We’ll deal with the first use in this article.

First, a bit of background. Late in Version 4, we introduced a new Generic control. We realized that a lot more could be done with it, so for Version 5 we enhanced it and renamed it Container.

Any page of HTML is made up of Elements. The specifications for HTML define a few dozen Elements. Examples are Paragraph (“<p>”), Input (“<input>”) and Button (“<button>”). Each of these has a whole bunch of parameters, grouped by Classes, Attributes and Styles.

Controls (also called Widgets) are structures made up of one or more Elements, with their parameters defined to provide a particular appearance or behaviour.

What AppStudio essentially does is create fancy HTML pages by making it easy to set up these Controls, then let you use them in your program. The Container gives you a control with complete control over its appearance.
Continue reading “Container, Part 1: Make your own control”

Simulate an Actual Device for Testing

Want to test how your app will look without have to download to a device? Recent enhancements to Chrome make this possible. Now it’s easy to watch the affect of different screen sizes and rotation on your app – all within the Chrome Debugger.

Run your app locally as usual. It will get started in Chrome. Open the Chrome Debugger by hitting F12 (option-command-J on Mac). See the phone shaped icon in the tab bar?

chromedebuggerdevice
Continue reading “Simulate an Actual Device for Testing”

Project CSS: Advanced Styling

Styles are a powerful tool for shaping the appearance of your controls. To a large extent, AppStudio lets you avoid having to learn a lot about them: it just handles them for you. But if you want to do something special, it’s easy to add extra styling of your own.

The most common place to put a simple style rule is in the ‘style’ property of a control. This is very specific: it will only apply to that specific control. Where the concept of styles gets powerful is the ability to have style rules apply to groups of controls.
Continue reading “Project CSS: Advanced Styling”

Modal Forms

AppStudio 5 makes it easy to have Modal Forms in your app. A Modal Form pops up over your app, dimming out the rest of the screen. The user has to close the Modal Form before continuing with the app. It’s useful for messages, password input or confirmations.

modalform

Modal Forms are created just like any other form. They can have the same controls, colors and backgrounds. A few properties need to be set differently:

  • modal: True
  • fullScreen: False
  • left and top: value does not matter – form will be centered.
  • width and height: pixels, percentages or ‘auto’

At runtime, show and hide modal forms like any other form:

Modal1.show()

There are a number of options you can set when opening a modal form. Set these using object syntax: inside {} braces, put key, value pairs. For example, to fade in the modal form over 1 second with a completely opaque overlay, do this:

  Modal1.show({fadeDuration: 1000, opacity: 1})

For the full set of options, see the docs.

Panels for navigation, forms, inspectors and more

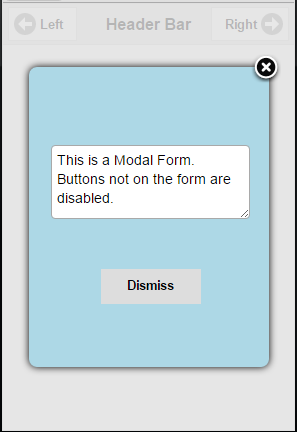
Ever wish you could slide a list of options in from the left or right? How about a compete form? The new Panel control lets you do this. Have are some examples:

panel2

panel3

panel3

When you activate a Panel, it slides in from the left or right to cover your existing form. Click on a close panel button or outside the panel area, and it will slide closed.

Visual Effects

There are three visual effects. Set the one you want to use in the display property.

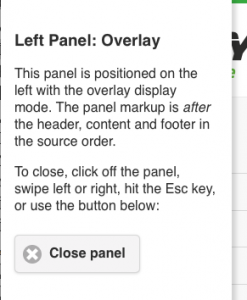
  1. Overlay: The Panel is overlaid on top of the current form.
  2. Push: The Panel pushes in, moving the current form with it.
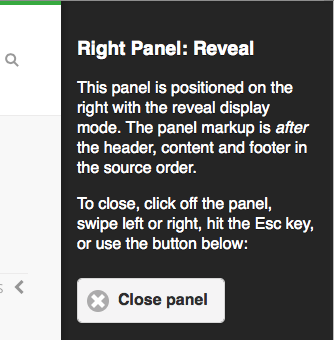
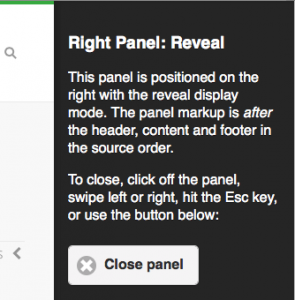
  3. Reveal: The Panel is revealed as the current form moves.

Formatting the Panel

There are two ways to load the contents of a Panel:

  1. HTML: Set the text property at design time with the text you want to display. It can also be HTML format, so this would be valid:
    <h4>Important Info</h4>
    Remember to save your data before you leave this form!
    

    Then, at runtime, do the following to open the panel:

    Panel1.open()
    
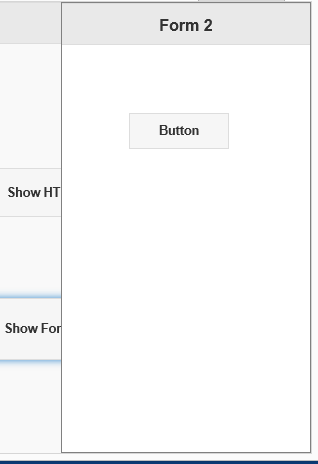
  2. Form or Container: Use the .open() function at runtime to open a Form or Container in the Panel. In this case, leave the text property blank, and open the panel as follows:
    Panel1.open(Form2)
    

Events
When you open a panel, NSB.currentForm is set to the panel, and the normal Form_open() and Form_close() events are run for the panel.

Clicking on any button on the panel, or outside the panel, will close it. You can also close the panel in code:

Panel1.close()

Full Screen Panels

If you set the width of the panel to 100%, it will take over the whole screen. That gives you the effect of having the new form slide in from the left or right.